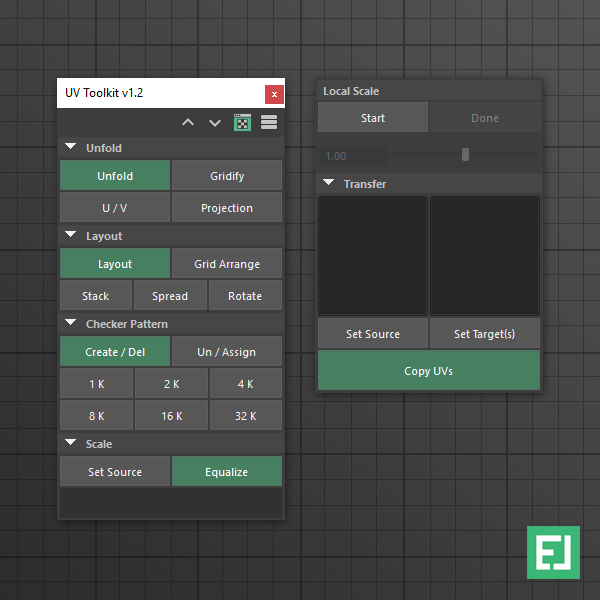
UV Toolkit v1.2#
What does it do#
Automates and simplifies aspects of the recurring UV unfold / layout process.
Interface#
Compatibility#
| Maya | 2017 | 2018 | 2019 |
|---|---|---|---|
| ✓ | ✓ | ✓ |
Installation#
-
Copy UVToolkit.py and UVCheckerPattern_1K.tga to :
-
Launch / Restart Maya
-
In Maya, open a Python Tab in the Script Editor and execute :
Warning
Please make sure that there are no Space characters in front of the code lines.
Option Menus / Help Line#
-
Option Menus can be accessed when you click on a button with the RMB 3.
Note
When a button features an Option Menu a little list icon appears next to the cursor.

-
The Help Line, along the bottom left of the Maya user interface, provides a short description of tools and menu items as you hover over them.
Tool Menu#
Info
The Tool menu is located in the top right corner of the toolkit.
-
Up arrow closes all tabs
-
Down arrow opens all tabs
-
UV Editor icon:
- LMB1 : Opens the UV Editor
-
MMB2 : Opens the UV Set Editor
-
Stack icon opens a new window with information about the tool
Unfold Tab#
Unfold#
Info
Automatically cuts selected edges, unfolds (based on Unfold 3D) and packs the shells.
-
Make a UV projection of your object.
Tip
For best results make a Camera instead of an orthographical (X, Y, Z) projection.
-
Select your desired cutting edges.
-
Click on Unfold to run the script.
Gridify#
Info
Automatically unfolds cylindrical shapes based on a cutting edge selection.
-
Make an edge selection on a cylindrical shape that serves as the cut line
-
Click on Gridify to run the script
U / V#
Info
Unfolds UV selections horizontally, vertically or freely in both directions.
-
Select UVs
-
Choose an option from the Option Menu
-
Click on U / V to run the script
Tip
Use the MMB 2 to pin the selected UVs during the unfold process.
Note
LMB 1 : Run script
MMB 2 : Pins selected UVs during unfold
RMB 3 : Option Menu
Option Menu options:
- Horizontal
- Vertical
- Free
Projection#
Info
Create UV texture coordinates for the selected object using a planar projection shape.
-
Choose an option from the Option Menu
-
Click on Projection to run the script
Layout Tab#
Layout#
Info
Automatically arranges objects UV shells and scales them uniformly.
Option to do it individually for every object.
-
Select one or multiple objects.
-
Set your options in the Option Menu.
-
Click Layout to run the script
Note
LMB 1 : Run script
RMB 3 : Option Menu
Option Menu options:
- Individual object
Shell rotation:
- Free
- 90 Degree
- None
Grid Arrange#
Info
Arrange object's UV layouts in a grid.
Option to sort layouts based on their polygon count.
-
Select one or multiple objects.
-
Define your layout scale size within the MMB 2 menu.
-
Set your options in the Option Menu.
-
Click Grid Arrange to run the script
Note
LMB 1 : Run script
MMB 2 : Set layout scale size
RMB 3 : Option Menu
Option Menu options:
- Sort by PolyCount
Stack#
Info
Stacks / overlaps object's UV layouts in the first UDIM, without changing the scale size.
Option to scale the layouts uniformly.

-
Select multiple objects.
-
Set your options in the Option Menu.
-
Option to set a uniform scale size within the MMB 2 menu.
-
Click on Stack to run the script.
Note
LMB 1 : Run script
MMB 2 : Set scale size
RMB 3 : Option Menu
Option Menu options:
- Uniform scale
Spread#
Info
Distribute object's UV layouts based on an input value.
-
Select multiple objects.
-
Choose a direction from the Option Menu.
-
Set a move value within the MMB 2 menu.
-
Click on Spread to run the script.
Note
LMB 1 : Run script
MMB 2 : Set move value
RMB 3 : Option Menu
Option Menu options:
- Right
- Left
- Up
- Down
Rotate#
Info
Rotate UV shells clockwise or counterclockwise.
Option to rotate each shell individually.
-
Select UV shells
-
Set your options in the Option Menu.
-
Click on Rotate to run the script
Tip
If Individual Shell is checked, select only 1 UV from every target shell.
Note
LMB 1 : Rotate clockwise
MMB 2 : Rotate counterclockwise
RMB 3 : Option Menu
Option Menu options:
- Individual shell
Rotation value
- 15
- 45
- 90
Checker Pattern#
Info
Creates a shader with a custom checker pattern texture (texture map size is 1K).
Useful to check if your UVs are properly unfolded, oriented and equal in size.
-
LMB 1 click on Create / Del creates the shader
- MMB 2 click on Create / Del deletes the shader
-
Select one or multiple objects
-
LMB 1 click on Un / Assign assigns the shader
- MMB 2 click on Un / Assign unassigns the shader
-
Choose your texture size:
- 1K
- 2K
- 4K
- 8K
- 16K
- 32K
Scale Tab#
Equalizer#
Info
Match your object's UV layout scale to the size of a specified source.
-
Select your source object
-
Click on Set source to define the scale reference
- The text area below displays the current source object
-
Select one or multiple target object(s)
-
Click on Equalize to match the scale size
Local Scale#
Info
Scale multiple UV shells at their individual center point.
-
Select 1 UV from every target shell
-
Click on Start to launch the interactive scale process
-
Use the Slider to scale the UV shells
-
Click on Done to finish the process
UV Transfer#
Info
Transfer UV layouts from source to target objects.
-
Set one or multiple source objects
-
Set one or multiple target objects
Note
If you have multiple source objects, the script will copy
from source 1 to target 1
from source 2 to target 2
and so on, until there are no sources left.
-
Set your options in the Option Menu. (RMB 3 click on Copy button)
-
Click on Copy to run the script
Note
Copy Button
LMB 1 : Run script
RMB 3 : Option Menu
Option Menu options:
Sample Space
- Topology
- World
- Local
- Component
Layout Scope
- All
- Current